Office 365
To receive logs from the Microsoft Cloud, it is necessary to open a TCP port that will be accessible from the whole Internet (Microsoft does not define ranges of IP networks from which it sends logs).
For this purpose, TCP port 8443 is set up in Logmanager - on this port, only the application receiving O365 events is listening and nothing else is accessible. There is no risk in exposing this port to the Internet.
Port 8443 located at Logmanager can be propagated to the Internet through your firewall on any available port of your choosing. The service listening on this port only accepts requests on the /wh/o365/ endpoint, and only the HTTP GET and POST methods - it returns HTTP error status code 400 for any other request.
The O365 service is not automatically started until the configuration of the application on the MS cloud is set and stored according to the document below.
How log collect from O365 works:
- Microsoft will send notify information on port 8443 Logmanager with IDs of audit events. If Logmanager is not available at this time, Microsoft will automaticaly try to send this information later.
- Logmanager will take received ID of audit events and download it from Microsoft. If Microsoft site is not available, it will try it automaticaly later.
- Logmanager will automaticaly renew API tokens every month.
For a functioning collection of audit events, it is necessary that Logmanager is having unlimited access on port 443 to the entire internet! Microsoft unfortunately does not have any static IP pools defined, at which events/API tokens may be placed.
Access to Microsoft servers requires transparent communication, i.e. without HTTPS/SSL inspection. Check your firewall settings to see if you are blocking communication or if you have HTTPS/SSL inspection (also known as MITM, or Man in the middle) enabled. If your firewall allows it, create a special unique rule for Logmanager to allow only the traffic you want.
See more about Office 365 APIs at https://docs.microsoft.com/en-us/office/office-365-management-api/get-started-with-office-365-management-apis
This document describes how to configure the Microsoft O365 cloud to send audit events to Logmanager system.
Make sure you have audit logging in Office 365 enabled, you can use this manual https://docs.microsoft.com/en-us/office/office-365-management-api/troubleshooting-the-office-365-management-activity-api#enabling-unified-audit-logging-in-office-365. Audit logging should be enabled automaticaly when you start using O365 service. If auditing is not enabled, registration from Logmanager will end with the following error message from the O365 cloud: ‘Tenant <tenantID> does not exist’.
-
In Logmanager, within the O365 component settings, fill in the Public URL for O365 log receive (Logmanager inside the network always listens on port 8443, though your firewall may expose any port externally. However, you must enter the full domain name of your public IP and the correct external port on which Logmanager will be accessible from the internet). After saving the form, press F5 to reload data from the Logmanager database.
-
Open Microsoft Entra admin center: https://entra.microsoft.com/#home
-
In the left panel, click “Show more” and open “Identity”.
-
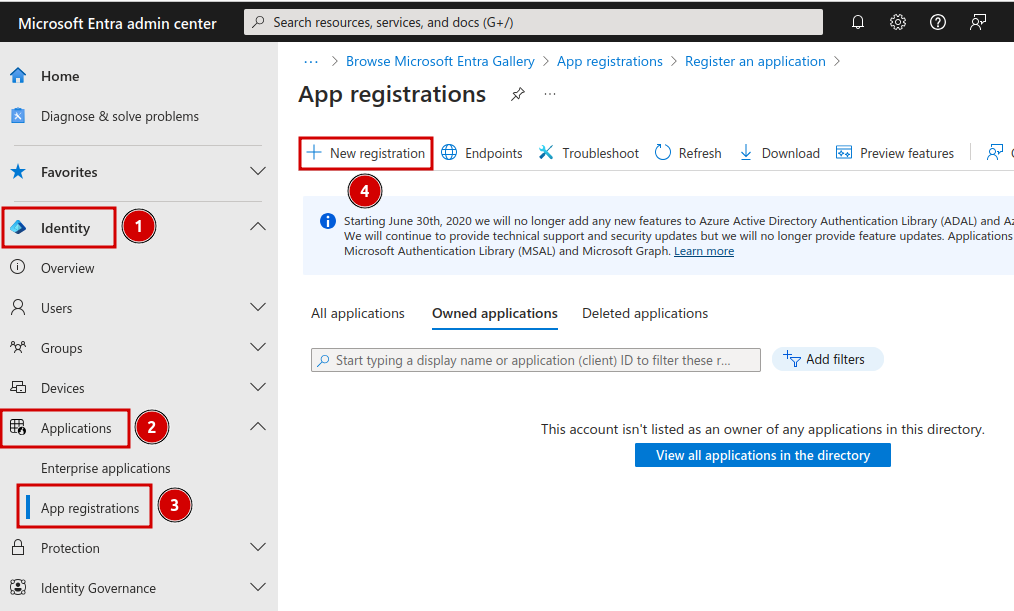
Next, select “Applications” and “App registrations”, then click “New registration”.
Application registration
-
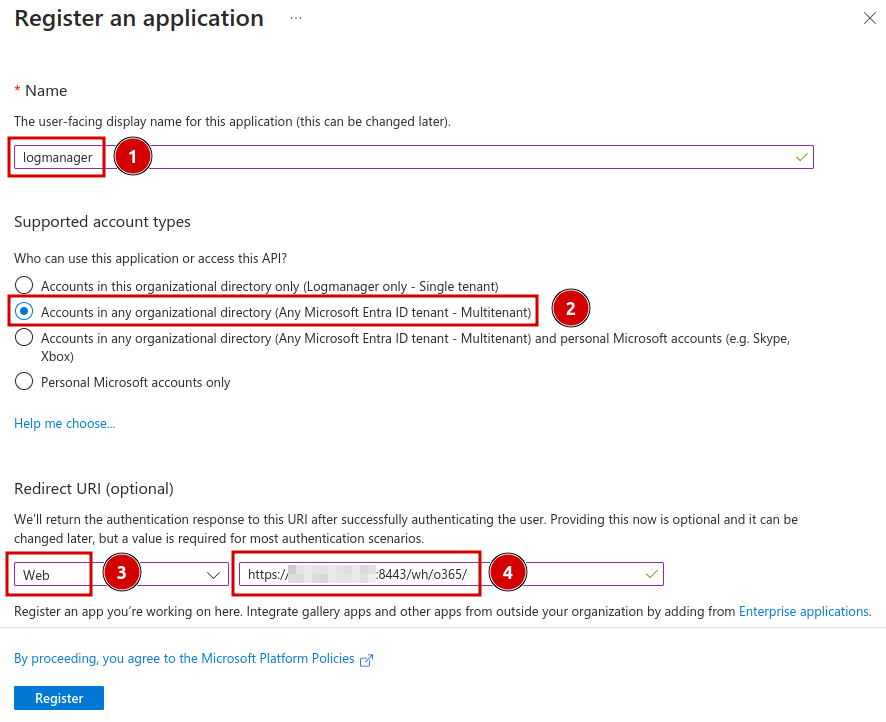
In the form, enter a custom name for the application. Each application you use should have a unique name. You will need to provide this value in the registration form for the Logmanager O365 UI component. In the supported account types, select the second option to allow access from any type of account.
In Logmanager, copy the value of the Public URL for O365 log receive and paste it into the Redirect URI field in the form on the Microsoft website, then click Register.- If you plan to collect logs from more organizations, select option „Accounts in any organizational directory“.
- If you are planning to collect logs only for your organization choose option „Accounts in this organizational directory“.
Application registration
-
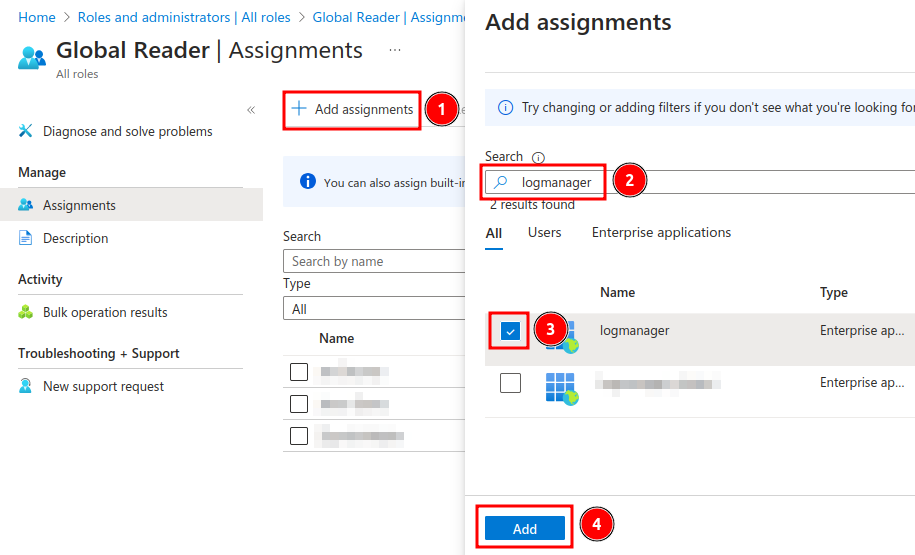
Navigate to “Identity / Roles & admins / Roles & admins”, enter Global Reader in the search field, and click the role that appears.

Setting the Global Reader role
-
Click Add assignments, search for the logmanager application created in the previous step, select it, and click the Add button.
Setting the Global Reader role
-
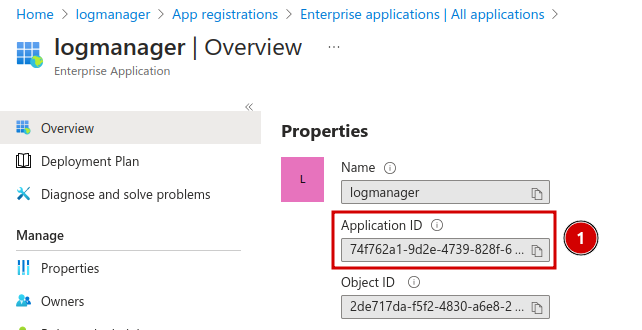
Go to “Identity / Applications / Enterprise applications”, where you can now see the Logmanager application. Click it, and on the newly opened Overview page, copy the Application ID and paste it into the Logmanager GUI.
Application ID
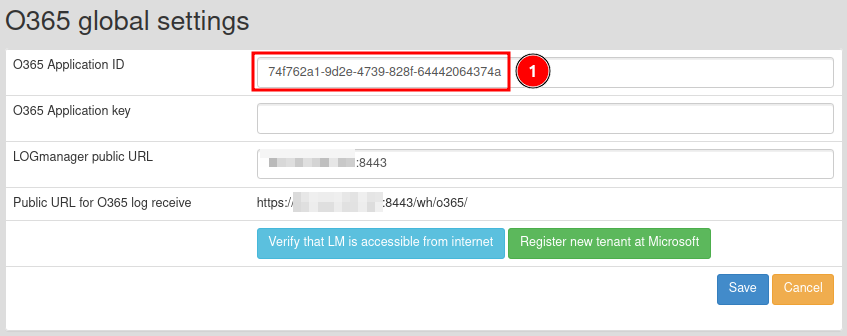
Application ID
-
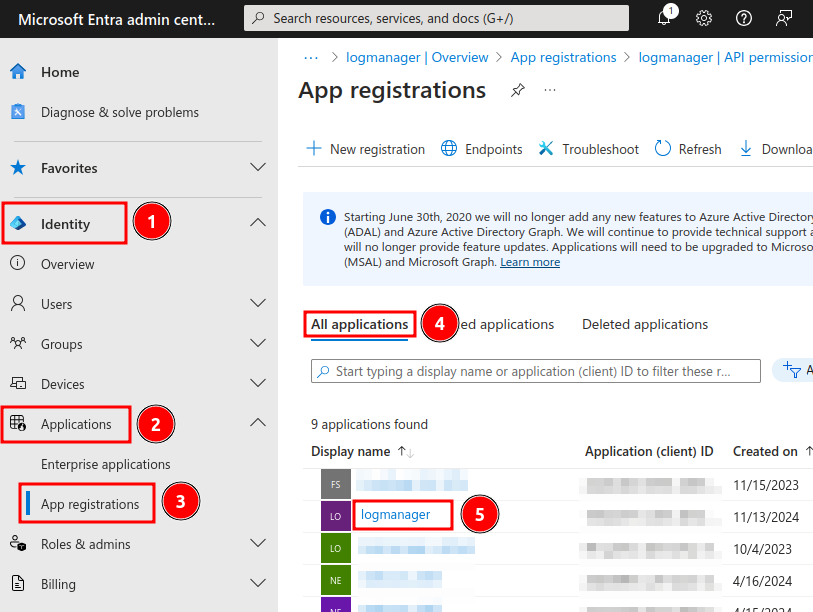
Now, you need to grant the newly created application permissions to read logs in the MS web console. Go to “Identity / Applications / App registrations”, click “All applications”, and select the Logmanager application.
API permissions
-
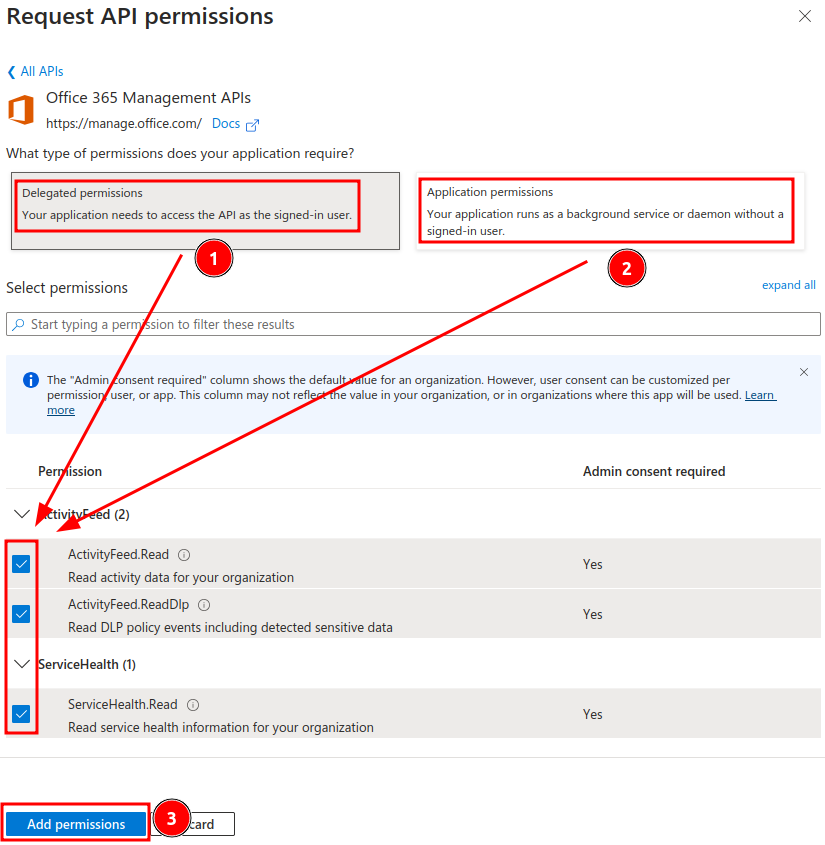
Next, click “API permissions” in the left menu, then click “Add a permission” and select Office 365 Management APIs from the list.
-
On the newly opened page, click “Delegated permissions” and check all the permissions. Then, click “Application permissions” and again add all available permissions. Finally, click the “Add permissions” button.
API permissions
-
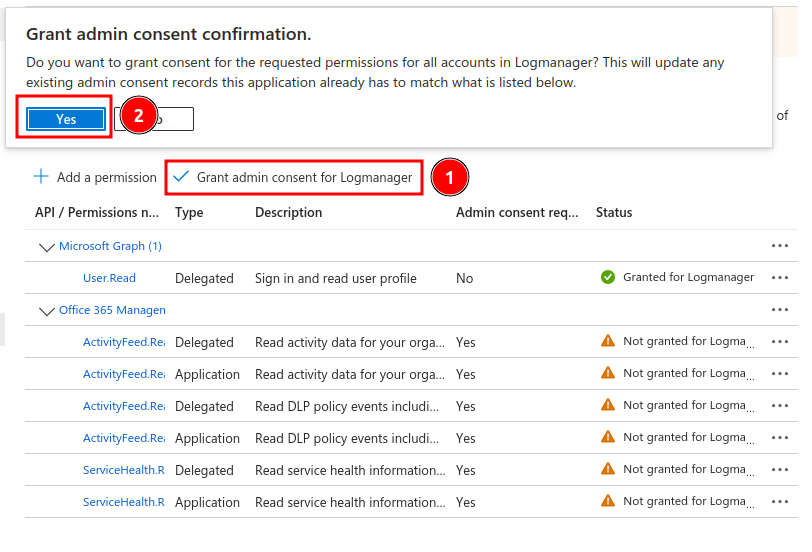
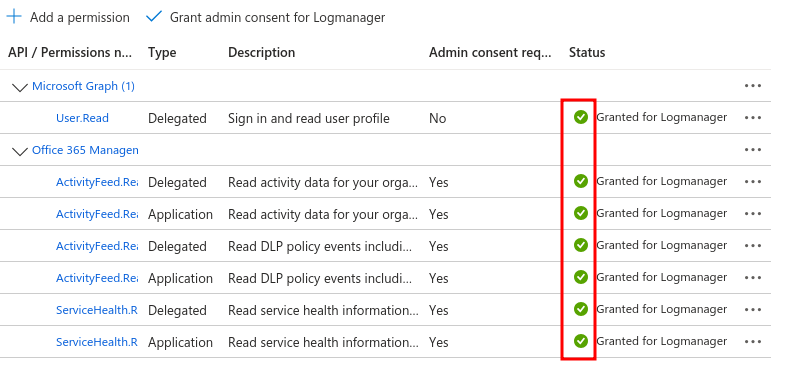
In the next step, it is necessary to approve these new permissions by an administrator. Click “Grant admin consent”, as shown in the image:
API permissions
-
Once the permissions are approved, everything should turn green:
API permissions
-
Next, on the Microsoft page, click “Certificates & secrets” and generate a new “New client secret”:

Certificates and secrets
-
Copy the generated secret key value to your clipboard.

Certificates and secrets
-
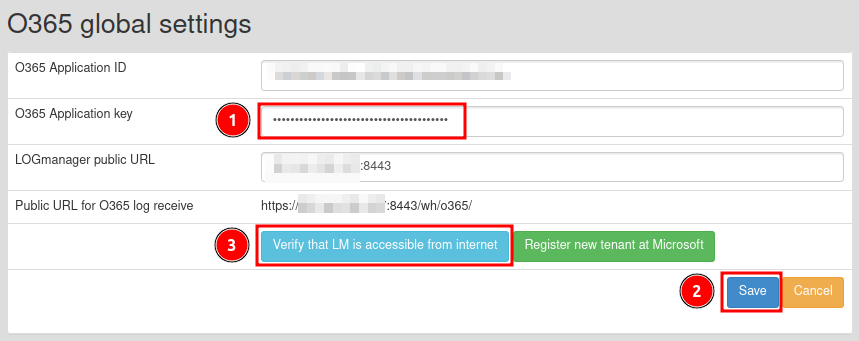
In Logmanager, paste the secret key value into the O365 Application key field, save the form, and refresh the page. Then, click the “Verify that LM is accessible from internet” button. A new webpage will open, which will use the Logmanager manufacturer’s web server to verify that the O365 component is accessible from the internet.
Certificates and secrets
The service is available only after saving the complete configuration of ID, key and public URL. If the test website tells you that the component is not available, please verify that you have entered the correct URL, Firewall penetration, filled in all form values.
- It is also necessary to register a new tenant for reading logs from MS (please continue only if you passed test of Logmanager public component availabilty from the Internet!). In the GUI Logmanager, just click the button „Register a new tenant at Microsoft“.
If the test website tells you that the component is invalid, refresh the Logmanager website using control-F5.
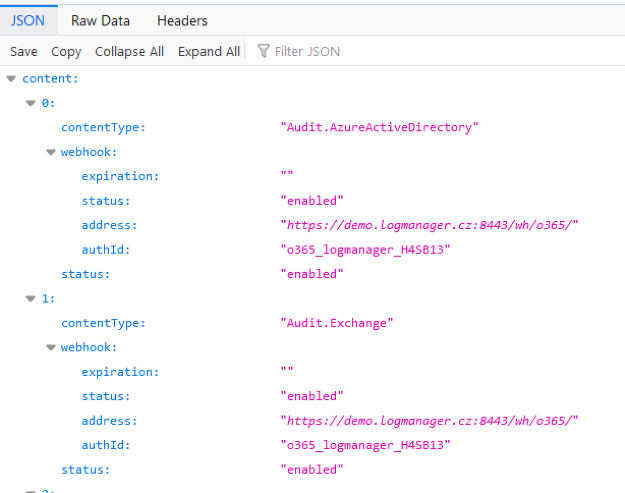
It should look similar to this:
O365 Tenant Configuration
or in JSON format command:
  {
    "content": [
      {
        "contentType": "Audit.AzureActiveDirectory",
        "webhook": {
          "expiration": "",
          "status": "enabled",
          "address": "https://demo.logmanager.cz:8443/wh/o365/",
          "authId": "o365_logmanager_H4SB13"
        },
        "status": "enabled"
      },
      {
        "contentType": "Audit.Exchange",
        "webhook": {
          "expiration": "",
          "status": "enabled",
          "address": "https://demo.logmanager.cz:8443/wh/o365/",
          "authId": "o365_logmanager_H4SB13"
        },
        "status": "enabled"
      },
      {
        "contentType": "Audit.General",
        "webhook": {
          "expiration": "",
          "status": "enabled",
          "address": "https://demo.logmanager.cz:8443/wh/o365/",
          "authId": "o365_logmanager_H4SB13"
        },
        "status": "enabled"
      },
      {
        "contentType": "Audit.SharePoint",
        "webhook": {
          "expiration": "",
          "status": "enabled",
          "address": "https://demo.logmanager.cz:8443/wh/o365/",
          "authId": "o365_logmanager_H4SB13"
        },
        "status": "enabled"
      },
      {
        "contentType": "DLP.All",
        "webhook": {
          "expiration": "",
          "status": "enabled",
          "address": "https://demo.logmanager.cz:8443/wh/o365/",
          "authId": "o365_logmanager_H4SB13"
        },
        "status": "enabled"
      }
    ],
    "msg": "Tenant registration result tenant_id: 6a98b5da-7b3c-4486-bb0b-66a048c6da62",
    "registeredContent": {
      "Audit.AzureActiveDirectory": "enabled",
      "Audit.SharePoint": "enabled",
      "Audit.General": "enabled",
      "Audit.Exchange": "enabled",
      "DLP.All": "enabled"
    },
    "result_subscribe_content": [
      {
        "Audit.AzureActiveDirectory": "OK"
      },
      {
        "Audit.Exchange": "OK"
      },
      {
        "Audit.SharePoint": "OK"
      },
      {
        "Audit.General": "OK"
      },
      {
        "DLP.All": "OK"
      }
    ],
    "status": "OK"
  }
-
Upon successful registration, you will see a page with the text output of the registration process (JSON data that represents Microsoft cloud.)
-
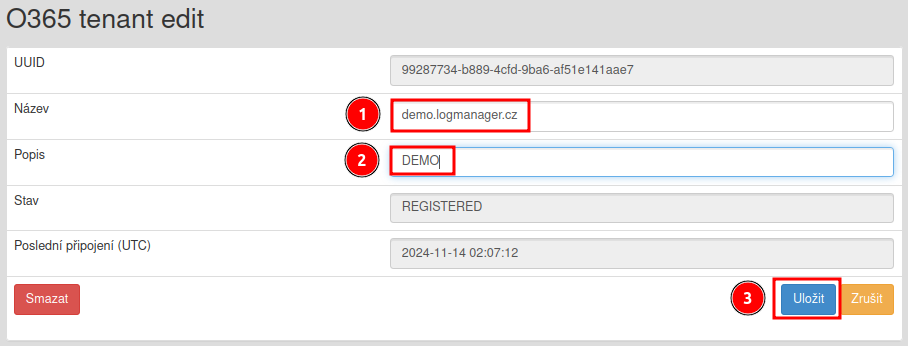
After registration, you need to manually set your organization name/domain at Logmanager menu Sources => O365. Edit newly created tenant without any domain and set it to your domain name
O365 tenant edit
-
In the end, you should see also the new tenant in Logmanager menu
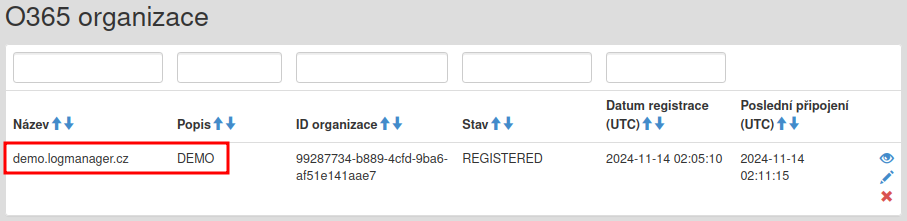
O365 tenants
Setting your domain name will automatically add this information to all logs received from O365 tenant to field meta.src.host.
If, when trying to register a new tenant (new domain), it gives a permission error, it is necessary to verify that the created application has the correct permissions set in such a way that other tenants can read data through it. This can only be found at the following link (the new MS Web UI does not provide this information): https://portal.azure.com/#blade/Microsoft_AAD_RegisteredApps/ApplicationMenuBlade/Overview/appId/ where application ID is required. On this page, look for: Supported account types, which must be filled in: All Microsoft Account Users.
Other O365 audit options can be found here: https://docs.microsoft.com/cs-cz/microsoft-365/compliance/enable-mailbox-auditing
See the following links for more details:
- https://docs.microsoft.com/en-us/azure/active-directory/develop/quickstart-register-app
- https://docs.microsoft.com/en-us/azure/active-directory/develop/v2-permissions-and-consent
- https://docs.microsoft.com/en-us/office/office-365-management-api/troubleshooting-the-office-365-management-activity-api#azure-application-permissions
You can limit source IP addresses that comunicate to Logmanager from the internet using this guide from Microsoft.