SQL agents
SQL agents function is used to load data from any table in SQL database. Typically from a table with log of user events from different applications, which use SQL database for data storage.
It is necessary to fulfill following requirements to connect to the SQL database:
- Table contains timestamp type attribute in YYYY-MM-DD hh:mm:ss format or YYYY-MM-DD hh:mm:ss.fff format.
- Timezone is correctly set on the server.
- Communication between Logmanager server and SQL server is allowed.
- User with rights to read the requested table in database with allowed access from Logmanager server IP address.
- Fields can be of any size up to a limit, which vary by database connector: an Oracle has a limit of 4000 bytes, MySQL has a limit of 65,535 bytes and Microsoft SQL has a limit of 8000 characters.
Attribute timestamp can be automatically converted to time in UTC.
- PostgreSQL server
- MySQL server (Maria DB)
- Oracle Database server
- Microsoft SQL server
See more below for supported versions.
PostgreSQL server:
| VERSION | SUPPORT |
|---|---|
| 15 | YES |
| 14 | YES |
| 13 | YES |
| 12 | YES |
| 11 | YES |
| 10 | YES |
| 9.6 | YES |
| 8.4 | NO |
More information about Versioning Policy of PostgreSQL here: https://www.postgresql.org/support/versioning/.
MariaDB:
| VERSION | SUPPORT |
|---|---|
| latest 10.4.12 | NO |
| mysqld 10.1.44-MariaDB-1~bionic | YES |
More information about MariaDB here: https://en.wikipedia.org/wiki/MariaDB.
Microsoft SQL server:
| VERSION | SUPPORT |
|---|---|
| SQL Server 2017 | YES |
| Microsoft SQL Server 2019 (RTM-CU3) | YES |
More infromation about versioning policy of Microsoft SQL Server here: https://en.wikipedia.org/wiki/History_of_Microsoft_SQL_Server.
Instances are supported in MSSQL and are entered to field Host in format IP address\instance.
SQL Server Browser service must be running for Microsoft SQL server instances support.
SQL agent connects to the SQL Server Browser service on UDP port 1434 on a specific server, and finds available instance names and their ports. If there is a match, connection to the specific port is established. If there is no match, attempt for connection to a standard TCP port 1433 will be made.
Oracle Database server:
| VERSION | SUPPORT |
|---|---|
| 19c | YES |
| 21c | YES |
Instances/Service names are supported in Oracle and are entered to field Host in format IP address/instance.
Example to connect to: db_instance.example.com oracle server instance running on host db.example.com use:
field Host: db.example.com/db_instance.example.com
field Database: db_instance
To determine the instance name, run command on the Oracle server:
lsnrctl status
Oracle Database has a specific behavior for size of the letters in table names and in names of the columns in the tables. It is necessary to comply with the size of the letters as they are stored in the Oracle database when creating a new agent.
How to enter data into the SQL Agent:
| SQL query | Oracle DB is stored | SQL agent |
|---|---|---|
| CREATE TABLE changelog (data_column VARCHAR2(200)); | CHANGELOG | CHANGELOG |
| CREATE TABLE “Changelog” (data_column VARCHAR2(200)); | Changelog | Changelog |
| CREATE TABLE changelog (data_column VARCHAR2(200)); | DATA_COLUMN | DATA_COLUMN |
| CREATE TABLE changelog (“Data_Column” VARCHAR2(200)); | Data_Column | Data_Column |
- Name and password for connection to the database cannot contain UTF-8 symbols.
- Name of the table cannot contain UTF-8 symbols.
- Log into the Logmanager server.
- Go to
Sources ‣ SQLand click the green plus icon.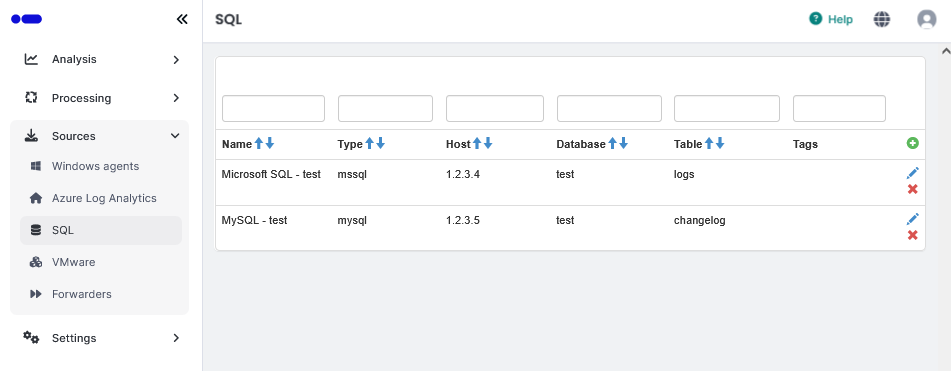
SQL agents overview
- Insert following data in the form:
- Name: name of the SQL agent
- Type: type of the database server
- Host: IP address or DNS name, or IP address\instance (only for Microsoft SQL and Oracle Database)
- Port: port, where the SQL server is running
- User name: user on the SQL server
- for Microsoft SQL: “SQL Server authentication login” username
- Password: password to the SQL server
- Database: name of the database
- Schema: name of schema (only for Microsoft SQL)
- Table: name of the database table
- Charset: charset of the database table
- Interval: Time interval defining how often Logmanager will download new data from the SQL server. The default value is 30 seconds. You can set a custom interval between 10 and 600 seconds.
- Timestamp column: name of the attribute of the timestamp type in the database table. Available format is YYYY-MM-DD hh:mm:ss or YYYY-MM-DD hh:mm:ss.fff.
- Timestamp in UTC: timestamp in table in UTC time (enable or disable)
- Columns: list of the attributes, which will be loaded to the Logmanager
- Tags: user tags (Tags)
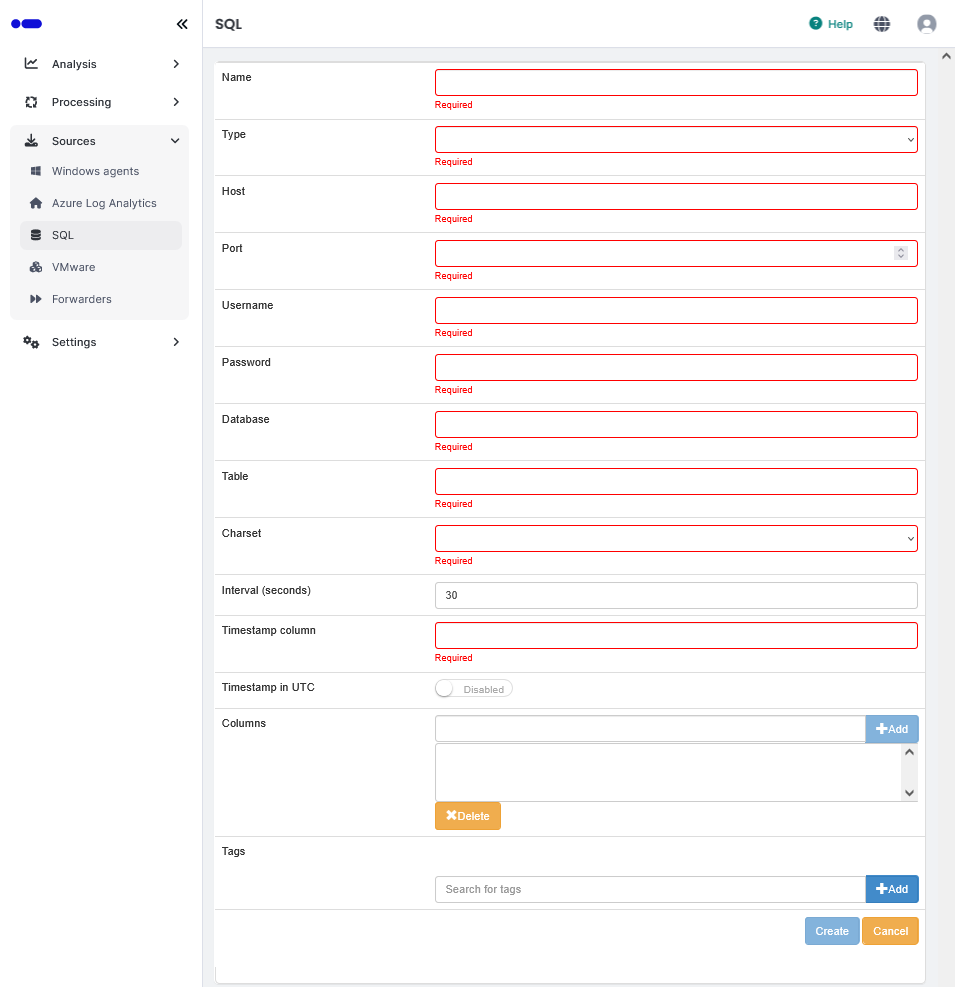
Add SQL agent
- Click on the Create button.
Data from the SQL server will automatically start to load to the Logmanager server.
To edit an existing agent, click on the pencil button. This will run the edit page. You can edit all details.
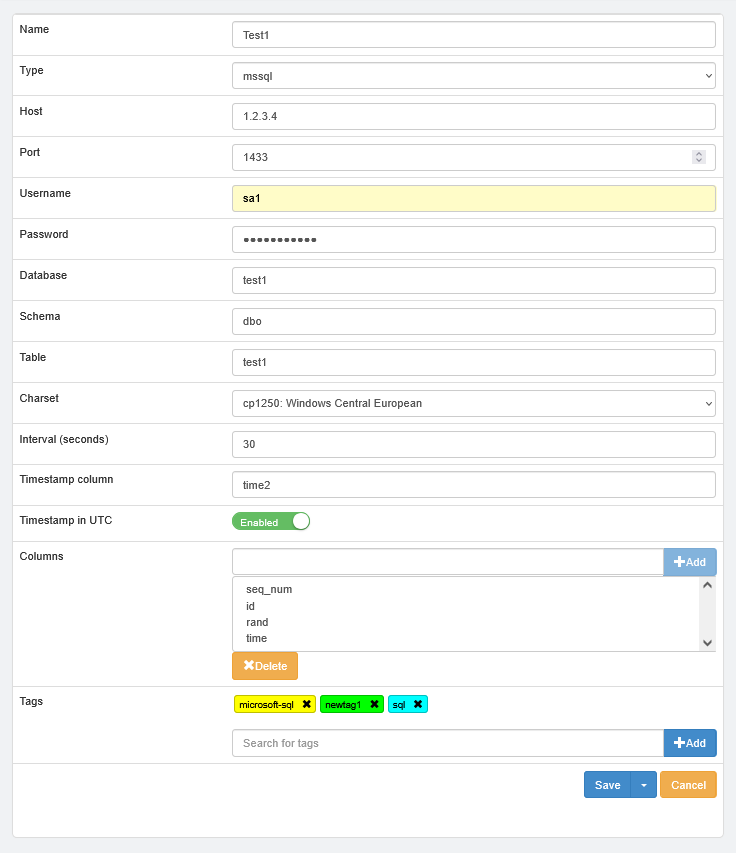
Edit SQL agent
After you are finished with the editing, you can save changes by clicking on the Save button, if you want to discard any changes done, click on Cancel button.
SQL agent can be deleted by the cross icon. That will run the deletion dialog.
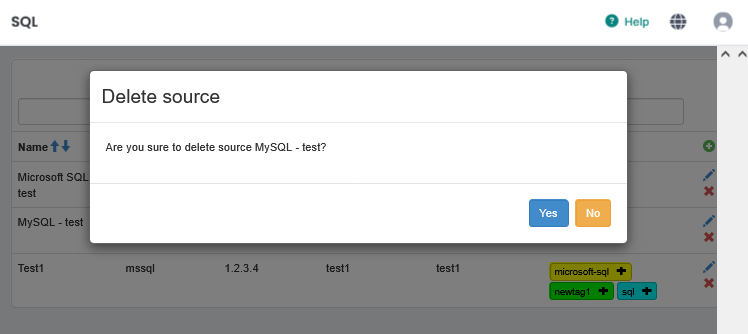
Delete SQL agent
Name of the agent you want to delete is shown for confirmation. To delete the agent, click on Yes, to cancel deletion, use the No button.
SQL agent follows this schema on the first run:
- Logs into the database server with provided credentials.
- Checks the time zone set on the database.
- Calculates value “time from” - finds actual time.
- Runs a query to check number of records in the selected database table with time interval 1 minute by the value “time from”.
- If the number of records is lower than 100 000:
- Runs a query to get data to the selected database table with time interval 1 minute in real time.
- Continues to item no. 7.
- If the number of records is higher than 100 000:
- Continues from item no. 4, but half time interval is used in comparison with previous iteration.
- Acquired data is stored to the Logmanager system.
- Waits 1 second.
- Saves time of the last processed row.
- Continues from item no. 4 and uses new time interval shifted by one second.
- If there is no other data for processing in the new time interval, waits X seconds and then continues to item no. 4 with interval expanded by X seconds. Where X is the interval set by you in the configuration of the SQL connector.
On repeated run of the SQL agent follows this schema:
- Logs into the database server with provided credentials.
- Checks the time zone set on the database.
- Calculates value “time from” - finds time of last saved row in the database table.
- Continues from item no. 4 in previous paragraph.
Agent reads data from database server from the oldest to the newest. If the agent has not communicated for a longer period of time with database server (for example due to unavailability of the database server), it starts to read data from the time of the last successful communication. Depending on your server load it can take more time, before the queue of unprocessed rows is processed. Therefore actual data from SQL agent may be displayed with delay.
In this chapter you will learn how to create a simple basic rule for parsing sql.
In Logmanager in the menu Processing ‣ Parsers, create a new parser.
The SQL Agent sends JSON data to Logmanager. In the textbox Test message, copy this message for example:
{"username": "Michael", "SRC_IP": "192.0.2.0", "Query": "SELECT * FROM `user`"}
Create a helper variable “item”. And use the update_dictionary and decode_JSON blocks to expand all fields:
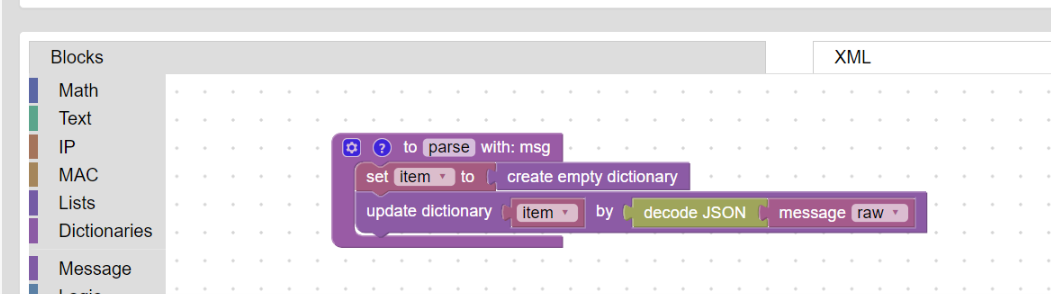
Decoding JSON
At this point all keys have their original name. It is necessary that the names of these keys contain only lowercase letters. To do this, use the blocks rename_to and to_lowercase.
Perform the iteration of all keys using the foreach block, and if it fulfills the condition (the key name contains capital letters), rename this key:
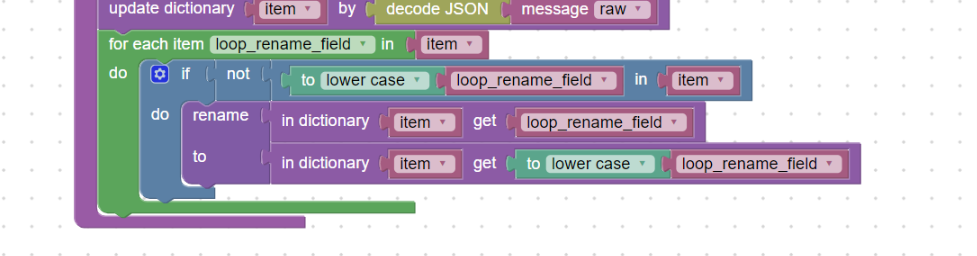
Rename keys
A typical modification of the incoming data is made in the “username” field where the user name is assumed to be lowercase. Using the block in_dictionary_set overwrites the original value of the field to lowercase (block to_lowercase):
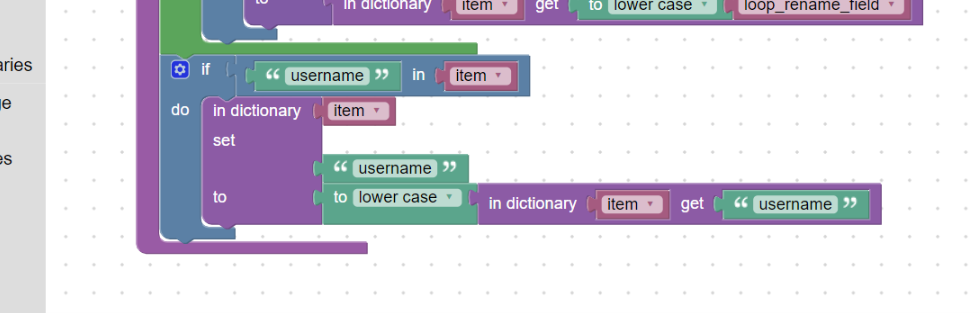
Lowercasing value
Now all fields are the string data type, if you need to change the data type, the block is retype_to. In the next helper variable, define the list of keys you want to change the data type. Then let the list go through the cycle, and if the key is present, retype to the desired data type:
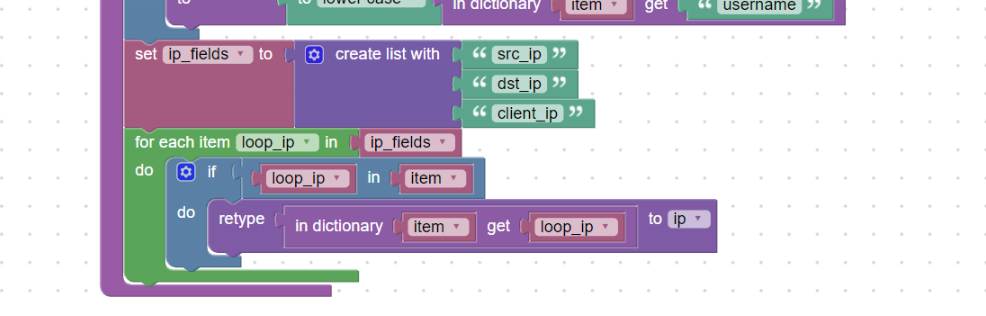
Retype
Finally, add the variable “item” to the main dictionary message_data using the block update_dictionary. The last block in the parser will be return_msg, which will save the resulting message to Logmanager where you will see it as msg object:

Updating the main dictionary
Final view of the entire parser:
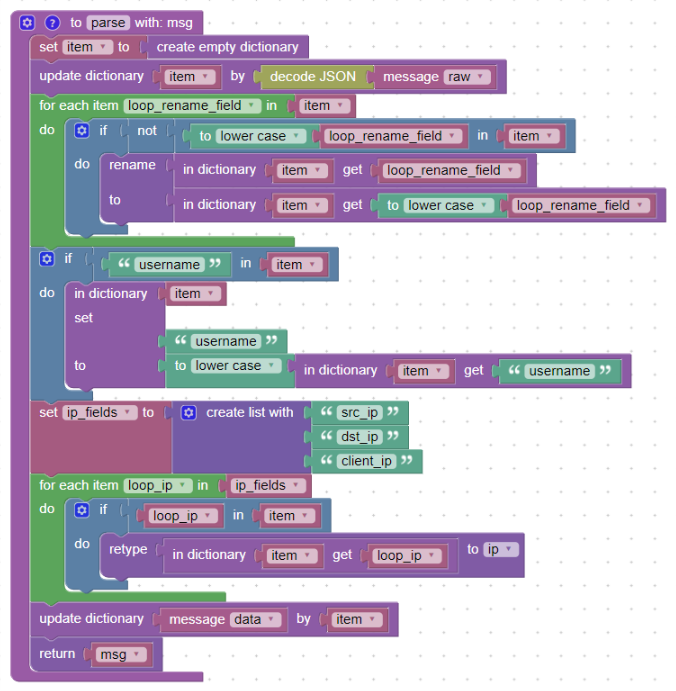
Complete parser form
Parser in the window Test output now generates such values:
msg:Object
   query:"SELECT * FROM `user`"
   src_ip:"192.0.2.0"
   src_ip@ip:Object
      city:"Unknown"
      country_code:"Un"
      country_name:"Unknown"
      is_link_local:false
      is_multicast:false
      is_reserved:false
      ptr:"192.0.2.0"
      value:"192.0.2.0"
      version:4
   username:"michael"
raw:"{"username": "Michael", "SRC_IP":"192.0.2.0","Query":"SELECT * FROM `user`"}"
Parser can be downloaded in XML format here SQL parser
A comprehensive parser tutorial can be seen in the How to Create a Parsing Rule chapter.